Step 1: First open any image.Here i worked with one of my favorite celebrities photo.

Step 2: Duplicate the layer by pressing Ctrl+J. Now apply the desaturate on the duplicated layer. Go to Image> Adjustments> Desaturate or press Ctrl+Shift+U.Then set the duplicated layer blending mode to 'Lighten'

Step 3: Duplicate the original background layer and place to top of the layer palette.
Go to Filter> Noise> Add Noise and set the amount 4% , Gaussian and Monochromatic.

Step 4: Set the Background copy 2 layer blending mode to 'Soft Light'.

Step 5: Again duplicate the original background layer and place to top of the layer palette.
Go to Filter> Blur> Gaussian Blur and set the radius level 6.0

Step 6: Set the Background copy 3 layer blending mode to 'Overlay'.
And here is the final result
 Now compare with the original photo.
So what about your girlfriend photo.


 Now compare between the first and final images and try it yourself.


 Step 6: Now its time to final touch . Go to image-rotate canvas 90°CW. Now go again Filters> Distort> Polar Coordinates and this time choose the upper -Rectangular to Polar- radio button. And Your Text is just rushing!
 step2: Now create a new rectangel with Rectanguler marquee tool within the photo as you like.
 now if you want to make inside blur then return to the select>feather >radius=20 pixels
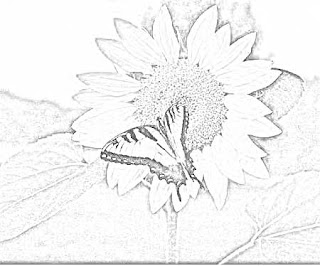
 Step 2: Duplicate the layer by pressing Ctrl+J. Go to Image> Adjustments> Desaturate or press Ctrl+Shift+U. Then go to Image> Adjustments> Invert or press Ctrl+I.And then duplicate the layer and blending mode to" linear light". The image will looks like below.

 Step 5: Again merge the layers together by pressing Ctrl+E.Now press 'D' to reset your color palette.Create a new layer by pressing Ctrl+Shift+N. Go to Filter> Render> Clouds.
 Step 6: Set the layer blending mode to 'Screen' and Opacity to '80.


