Saturday, September 26, 2009

Dreamy glow effect of a photo

Hi guys! Todays tutorial is about dreamy glow effect. As i always try to make photoshop easier for you in this tutorial you will see how within just few steps a normal photo turned into dreamy photo. So enjoy another cool and easy tutorial.

Step 1: First open any image.Here i worked with one of my favorite celebrities photo.

Step 2: Duplicate the layer by pressing Ctrl+J. Now apply the desaturate on the duplicated layer. Go to Image> Adjustments> Desaturate or press Ctrl+Shift+U.Then set the duplicated layer blending mode to 'Lighten'

Step 3: Duplicate the original background layer and place to top of the layer palette.
Go to Filter> Noise> Add
Noise and set the amount 4% , Gaussian and Monochromatic.

Step 4: Set the Background copy 2 layer blending mode to 'Soft Light'.

Step 5: Again duplicate the original background layer and place to top of the layer palette.
Go to Filter> Blur> Gaussian Blur and set the radius level 6.0

Step 6: Set the Background copy 3 layer blending mode to 'Overlay'.

And here is the final result
Now compare with the original photo.

So what about your girlfriend photo.

Friday, September 25, 2009

Pencil sketch effect of a photo

Hi guys! today i am going to show you a very easy and cool tutorial of photoshop .Have you ever thought about making your friends sketch? very tough if you are not good in drawing. But you can make now anyone sketch within just two minutes. So here is the easiest tutorial for you.

Step 1: First open any image.


Step 2: Go to Image> Adjustments> Desaturate or press Ctrl+Shift+U.Duplicate the layer by pressing Ctrl+J and then go to Image> Adjustments> Invert or press Ctrl+I. The image will seem like below.


Step 3:Now set the duplicated layer blending mode to 'Color Dodge'.

Step 4: Select the duplicated layer, go to Filter> Blur> Gaussian Blur and set the radius 3.0

Step 5: Select the duplicated layer, go to Image> Adjustments> Levels or press Ctrl+L and apply these following setting:


Step 6:Now duplicate the first layer by pressing Ctrl+J and place it on the top.
Set this layer blending mode to 'Soft Light'.

And here is the final result


Friday, September 18, 2009

Converting a photo into painting

Hi guys ! Today i am going to show you how to how to give a photo the cool painting look. This will give you a further access in photoshop world.

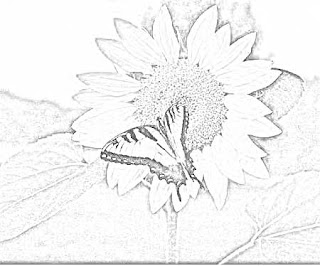
Step 1: First, find a suitable photograph. Sunflower is one of my favorourate flower so check out my painting.


Step 2: Then duplicate the sunflower photograph layer (Ctrl/Cmd + J). Then desaturate the duplicate (Image > Adjustments > Desaturate or Ctrl/Cmd + Shift + U). Then duplicate the desaturate layer and invert the new one (Ctrl/Cmd + I). Name this layer "invert". At this point, your image should look similar to this one.


Step 3: Now change the blending mode of the "invert" layer to Color Dodge. At this time nothing will seen in the picture. Then make the "invert" layer active by clicking once on it and choose Filter > Blur > Gaussian Blur. Enter a setting between 2-3 pixels. I set here 3 pixels. At this point, you could stop here if you chose, and you would have a great pencil sketched look to your image.


Step 4: If you are moving on then click once on the "invert" layer and merge it with the "desaturate" layer by pressing Ctrl/Cmd + E. Then change the Blend mode of this new layer to Luminosity.


Step 5: Almost done. Finally, you have a few choices of filters to run on this layer. Chose Filter > Artistic > Fresco with the following settings.


Step 6:The picture looks great but there is one more trick. Often the filters we ran on the image gave me too strong of a painterly effect. So go to opacity options set it as you wish. I set here 90%. Here is the final result.
Now compare with the original picture.

Thursday, September 17, 2009

Making a sencored photo

Hi guys ! Here i am back again . Today i am going to show you how to make an image sencored within just five seconds. Hope you will enjoy it.


Step 1: First open an image


Step 2: With the elliptical selection tool drag and select this persons face. Now Go to Filter> Blur> Gaussian Blur and set the radius 10.0 .The image will look like this


Step 4: Still having the face selected. Now go to Filter> Pixelate> Mosaic .Now deselect the selection. So go to Select> Deselect or press Ctrl+D.
And finally here is the result.

Thursday, September 10, 2009

Diffusion glow effect of a photo


Hi guys in this tutorials i am going to show you how to give a photo diffusion glow efect.


Step 1: First open any image . I use here from one of my friends photo.For publish it in blog i had to reduce the picture quality. I sugest you to work with a good quality but normal right photo to get most desired result.


Step 2: Duplicate the layer press ctrl+j and blending mode to screen .


Step 3: Now to add alayer mask to the top layer so go to Layer> Add Layer Mask> Reveal All.

Make sure the layer mask is activated. The thumbnail of the layer mask in the layer window should have a white border around it. If it does not, click on the thumbnail to activate the layer mask.

Step 4: With the layer mask activated, go to Image> Apply Image and use these settings:

Step 5: Click on the thumbnail of the top layer to deactivate the layer mask. With the top layer selected, go to Filter> Blur> Gaussian Blur. I set here the radius is 11.but you can increase it as untill the desired result is ahieved.


Step 6:Now you need to add another layer mask but Photoshop will only allow one raster layer mask per layer. To get around this, you simply group the layer so press Ctrl+G and add a layer mask go to Layer> Layer Mask> Reveal All, to the new group created.


Step 7: Now on the thumbnail of the new layer mask. With the layer mask selected, use the Apply Image so go to Image> Apply Image tool to apply the entire image to the layer mask and repeat the step 4.


And here is the final result. Here i have to reduce the image quality a little bit for the ease of publishment in blog.


Now compare between the first and final images and try it yourself.

Tuesday, September 8, 2009

Rushing text

Guys without motion everything seems to be boring . We need speed in every aspects of life . So why not in text. So check out it in RUSH HOUR.


Step 1: Open a new document I use 400*300 pixels here . Its upto you what resulation would you use.whatever make the background black and type the letters in white. Now press Ctrl+E to to merge down layers.


Step 2: Now go filters> Blur> Gaussian Blur and set it 1.5 .Then go to Filters> Stylize> Solarize. Your text looks like this


Step 3: Then use image => Adjustment => Channel Mixer and set the values like below.You can bring variance in color as you like.


Step 4: Now go Filters> Distort > Polar Coordinates and choose the lower -Polar to Rectangular- radio button.


Step 5:Now rotate the canvas .Go to Image> Rotate Canvas> 90°CCW. Next we apply Filters> Stylize> Wind - from left -you may use it two times; depending on your image size
Step 6: Now its time to final touch . Go to image-rotate canvas 90°CW. Now go again Filters> Distort> Polar Coordinates and this time choose the upper -Rectangular to Polar- radio button. And Your Text is just rushing!

Making inside or edges blur of a photograph


Guys you may have noticed that in many graphic design designer draw an edge blur effect that increase the attraction of a photo. Follow the instructions given below because you are gonna learn to do so............


step1: 1st open any image you like. I took this photo from vista wallpaper


step2: Now create a new rectangel with Rectanguler marquee tool within the photo as you like.


step3:Now go to select> feather>radius=20 pixel


step4:Now press the Ctrl+Shift+I and now press the 'Delete' key on your keyboard .


and here is the final result


now if you want to make inside blur then return to the select>feather >radius=20 pixels


Than


ctrl+i and press "DELETE" key .


Now see the result.


You can bring variance in selection tools or in feather radiuses size.


Giving a photo horrible effect

Guys here is an easy and cool technique for you how to make a beautiful photo into a horrible one. Just watch and see how smiling celecrity turns into an evil spirit .


Step 1: First open any image. I colected this photo from internet. This photos actual size was 1152*864 pixels. But for placement in blog i reduced its size to 500*375pixes . While working with this technique i suggest you to collect a bright and good picture with high resulation.
Step 2: Duplicate the layer by pressing Ctrl+J. Go to Image> Adjustments> Desaturate or press Ctrl+Shift+U. Then go to Image> Adjustments> Invert or press Ctrl+I.And then duplicate the layer and blending mode to" linear light". The image will looks like below.


Step 3: Merge the layers together by pressing Ctrl+E.Then duplicate the layer and go to Filter> Blur> Gaussian Blur and set the radius to 3 pixels. Remember this blur adjustment is very much important because sometimes you may have to set the radius to 20 pixels or more than this .


Step 4: Again duplicate the layer and set the blending mode to "linear light". After that the image will look like below.

Step 5: Again merge the layers together by pressing Ctrl+E.Now press 'D' to reset your color palette.Create a new layer by pressing Ctrl+Shift+N. Go to Filter> Render> Clouds.
Step 6: Set the layer blending mode to 'Screen' and Opacity to '80.


Step 7: In the final step go to Layer> New Adjustment Layer> Gradient Map and click the Mode drop menu select 'Lighten'.


And heres the final result..


Try it with other pictures.

How to make an cartoonish effect


Hi !graphics enthusiastics. What if all of your friend starts looking like cartoon characters .I have a very easy technique to do this . Check it out here.


Step 1: First open an image. I collected this photo from web. You can use any image with high resulation and good quality.


Step 2: Duplicate the background layer by pressing Ctrl+J.Go to Filter> Artistic> Poster Edges .The image will looks like below.


Step 3: Then lighten the image a bit by going to Image> Adjustments> Brightness & Contrast and set the Brightness level to 15 and Contrast level to 26.
And heres the final result..